Friday, October 29, 2010

Halloween by Debby Visser

Wow Erica and Susan did fabulous jobs with this challenge! I love the house, might try that but for Christmas instead; as Halloween is too soon for me to get it done. And I love the mini book Susan did, such a great idea! I bet the kids love it.

Around here, Halloween can last all year, well the dressing up part anyways. All 3 of my boys have 'costume trunks' and they are always digging in them. They will even dress up any friends that come over, including adults! lol

Here is my youngest as 'Jaxonstein', this costume is too small this year. Makes me kinda sad when we have to say goodbye to some of them.


Getting good pictures at night can be difficult, so I had my kids dress up early and we took photos on the lawn before dinner.

Halloween also means trips to the pumpkin patch. Last year I went along and got some great shots, so many in fact that I created pocket pages so I could include them all on one double page spread.


I am working on another page right now from this years pumpkin patch trip. Hope to have loaded on my blog this weekend. I am using FAB papers by Magenta Style. They have such rich coloured papers.

I hope you get a chance to get creative this weekend! And stay safe while out trick-or-treating!!
Debby

Halloween Challenge by Erica Perkins

It's the most wonderful time of the year...with so much mistletoeing and ... oh wait, wrong season. You wouldn't know it with the Christmas decorations all over the stores and the blitz of toy ads on tv these days. Halloween was always a blip on the radar as my eyes and wishes looked forward to Christmas, but since having children, my love of Halloween seems to grow bigger and bigger each year.

I look forward to picking out costumes with the kids and seeing what they thing is spooky enough or even cute to dress up as, I add more pieces to my witch costume, I add a few more decorations to our home's Hallween bin and I've even started to use my scrapping goodies at Halloween.

This year, I finally altered a corrugate house I've had for a couple of years for Halloween.

I started with the roof and scallop cut a bunch of 1" strips and layered them up the roof. I curled up the edges for a bit of dimension. I covered the outside of the house with two different colours (orange and green) and inked the edges just a tad. The windows looked awfully bare and I didn't want to get too fussy, so I cut up a few little "shutters" (purposefully crooked) and stuck them on. I used a cloudy plastic folder I had around and cut pieces to fit in the windows, but I pop-dotted them back a bit from the walls to give more dimension and shadow. I also added a couple of Colorbox glittered chipboard bats flying above the house.


From there I added some Dream Street rub-ons to one side.


And some Martha Stewards stickers on the other side and back.


The fence was done with a Martha Stewart sticker which I mounted by folding transparencies and creating space between the house and the fence....that likely doesn't make much sense.

I love how it turned out. I've put a flameless candle inside that flickers and makes it seem a little bit spookier too.

Halloween Challenge by Susan Tutt

It is friday and time for another great challenge! This weeks challenge is anything Halloween, so get ready for some project overload!!

I created this layout of my daughter using My Minds Eye Halloween paper line . I love the muted oranges of this paper. Adding lots of dimension and texture to my pages is kind of my thing, I used buttons, tulle, chipboard letters, sewing, pleating of paper and an acrylic journaling spot from Maya Road to achieve this. I also added dimension to my picture by printing both a b/w and colored photo. I cut the pumpkin from the colored photo and adhered it to my b/w photo with a pop dot.


Lots of distressing with paint and an edge distresser, on this layout. I also love to add non scrapbooking items to my pages like these pipe cleaners that I sewed on to the edge of my photos.

Using non traditional papers on a themed page is another thing I like to do on my layouts. I used Sasafrass Lass on this pumpkin carving page.

These cute pumpkins were cut on the Cricut.

This cute little mini album was made using drink coasters! I modge podged patterned paper to the coaster to create this fun cover!

Using a mask can create a great page, I used Heidi Swapps bat mask on cardboard.


I hope I have given you some new ideas for scrapbooking all of those pictures you will be taking this weekend of your little trick or treaters! My kids are so excited for Halloween, this year I have a little warewolf and an 80's girl. I was a teen in the 80's and it is hard to believe we dressed like that!! Have a safe and fun Halloween!

Friday, October 22, 2010

All About Me Challenge by Virginia Wong

"All About Me" - Really???

I can honestly say that I rarely, as in not ever, scrap about myself. Why? I don't know but it kinda feels a bit self-centred. *blush* However, a few months ago, my youngest daughter was looking through a scrapbook and said, "Mommy where are you?" I stopped for a moment and thought, "Yeah, where am I?" And that is how this layout came about.


Supplies: Nikki Sivils (pattern paper, paper die cuts), American Crafts (alphas); Making Memories (mini alphas); EK Success Writer (stitching)

Thank you for letting me share!

All About Me Challenge by Chriss Hird

There are so many things we love to scrap...our kids, families, special occasions, the every day. But how often do we scrap ourselves? If you're like me, not all that often. But when you think about it, why don't we? We tell the stories or everyone else's lives in our scrapping, why not our own?

I thought long and hard about this challenge (and that's why I'm late in posting lol!). My inspiration was one of my all-time favourtie quotes. The thing is, that it highlights my "maybe not so good" traits...but its so true of me, at times ;) And why not scrap about who we really are, great and not so great?

So here I am:


I really had fun with this challenge and I hope it inspires you to tell your story, however you decide to tell it ;)

What About You Challenge ... Jo West

... or as I like to say ... it's all about me!  and that's what we want to inspire you to do this week ... something all about me ... but in your case, all about you!  If you have never scrapped yourself before I urge you to consider starting ... no, its not something done out of vanity ... it's something that leaves a bit of you for future generations ....

I am blessed in that i have a lot of wonderful vintage family photos ... and i look at them an wonder .... wonder why my grandmother is smiling, wonder what my mother was thinking as she is sitting on top of that car ... wonder what their thoughts were at certain ages ... what they did on a daily basis ... what they felt, imagined, dreamed, wished for ... so let's record a little of that kind of information for future generations so that they don't have to wonder and they do have an idea.


I have done several All About Me projects ... from a one page layout ... just showing the events of a random day all the way to a complete 8 1/2 x 11 album, which is a compendium of me ... one page for each letter of the alpha, full of journalling all about ... yeah me ...  that one took 26 weeks to complete ... I did one letter a week ... but it is comprehensive ...


One of my favourite projects was a box with a series of 10 teeny tiny books.  Each book covered one subject, such as my favourite people, my music, my friends and family etc ... this was a wonderful little project and it was a snapshot of my fave's at the age of 50.  


So take the challenge ... do an all about you project, be it a page or an album ... it's time to celebrate you and leave something for future generations to learn from ...


Tuesday, October 19, 2010

Monday Card Challenge! Embossing!

No better way to conquer a Monday than with some creative output, wouldn't you agree? Join us for another card challenge - embossing! Dry embossing, heat embossing...or both! Show us what you came up with...

Monday, October 18, 2010

Monday Card Challenge - Embossing by Cari Locken

I absolutely love the look of embossing. Whether it's been done dry (by embossing on cardstock with Cuttlebug templates) or by stamping and using embossing powders. I just love the end result.

I've done quite a bit of dry embossing and here a few examples.
Both of these I used a Cuttlebug embossing folder on Core'dinations cardstock (which I just love for embossing. It has a different core color so when you sand the embossed image it reveals the image just wonderfully!!)
Supplies used: Core'dinations cardstock, SRM sticker, Prima flower & lace, Queen & Co rhinestones, EK Success punch, twine, Cuttlebug embossing folder

Supplies used: Core'dinations Cardstock, Imaginisce paper, rhinestones used with i-rock tool & chipboard, May Arts ribbon, Cuttlebug embossing folder, EK Success punch

This last one is a card where I stamped the dove image and then sprinkled red glitter embossing powder overtop.

Supplies used: Gelatins stamps & embossing powders, Bazzill Cardstock, American Crafts paper

Thanks for looking and hope you have fun trying some embossing with your cards.

Monday Card Challenge By Susan Tutt

My challenge this week is to incorporate a tag or tags and dry or wet embossing onto a card! Wow that's a lot for a little ole card. But look what I came up with. I made my card tag shaped and embossed it with a fun distressing technique that I am going to share with you! First of all here is the card I created. I love the urban modern look of it, it would make a great card for a teen.
There are a lot of textures going on here! First I started by sponging ink through a piece of metal screen. Next, I stamped my card with a Fancy Pants circle stamp and heat embossed with silver embossing powder. To create the distressed embossed look I placed a piece of printer paper over my embossing and ironed it with a warm iron. The iron melts off some of the shine from the embossed areas and gives it a flat or distressed look. I also added some color to random circles with colored distress inks. The last thing I did was to spritz a little glitz spray to the card.

I hope you enjoyed my distressed embossing technique today! I want to see how I inspired you today, so post your embossed tag card and link it to your comment.

Sunday, October 17, 2010

Stamping Challenge!

This week's challenge is to stamp it! Use your stamps on a layout, card, mini album...you decide! Acrylic, wood mounted, clings, or even foam stamps (don't we all have a bunch in our stash?!) Our design team has provided us with some very creative examples - now you share!

Friday, October 15, 2010

Stamp It Challenge by Debby Visser

I love stamps and have quite a big collection. They are reusable and therefore a very smart purchase. Especially when it is an image or saying you can see yourself using again and again. Change the colour or direction of the stamped image and you have a totally different image. For example on this first layout I used a Stampin Up tree stamp and turned it to be a branch. Then stamped a bunch of flowers and added them to the branch. And because I love dimension, I pop dotted it all. The little bird is from Magenta; I love their laser cut chipboard!


For the next layout I used some circle foam stamps with paint and created a bit of a border around my photos. Was simple and easy.


The next couple of cards I created by stamping the image many times on different papers then cutting out each little design and layering it. The little boy and dog is a Magenta stamp and the lion is a Close to My Heart stamp.


So pull out those stamps and create!!! And if you do, share with us, we would love to see what you are doing!!
Have a great weekend and happy creating!
Debby

Stamp It Challenge By Chriss Hird

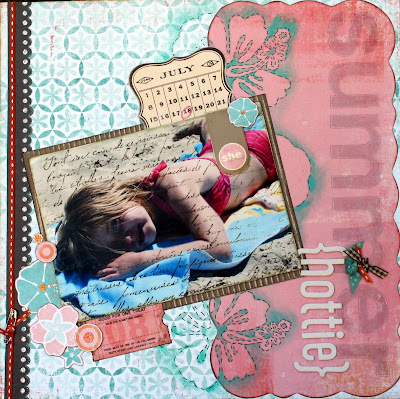
Stamps...one of my scrapbooking weaknesses! I have a ton of them, they're so versatile! There are so many techniques you can try with your stamps. Sometimes I have difficulties using my stamps on layouts though, so I thought this challenge was great, because it got me thinking about how I could stamp on my layout in a way that was a little out of the ordinary. Here's what I created!

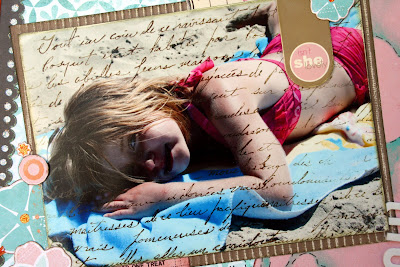
I love how this "Summer Hottie" layout turned out. I didn't do a lot of stamping at all, but what I did do is quite effective, I think. If you look at the close up photo below, you'll see script stamped right on the photo itself, yet there's not script over my sweet daughter's face...hmmm. Really, its so easy, and pretty cool. All I did was cut a circle out of some scrap cardstock and place it over the area of the photo I didn't want stamped - I masked it. If you want to stamp on photo paper you'll need to use Staz On ink - it dries fast so it won't smudge. So I inked up my background stamp with Staz On, then stamped the photo. Then I took the mask off and voila! I've added an interesting element to the photo!


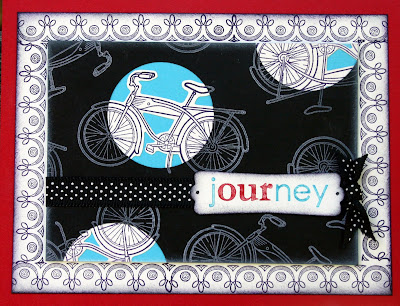
Here's a card I created using a technique called "Reverse Spotlighting". Stamp your images on whatever size cardstock you are using on your card. Then, using a punch, cut out a few "spotlights". Whatever number of spotlights you've punched out, stamp the same number out on a different colour cardstock that has a good contrast. Cut out the image and place behind the spotlight piece, matching up the lines of the image. Tape it in place, then adhere to a background piece of cardstock. And that's it! I love this technique, and this particular card is a favourite of mine.

I hope this inspires you to pull out some of your stamps and play with them. And I hope you post some of your creations, we'd all love to see them! Happy Friday!

Stamp It Challenge - by Cari Locken

Well, I have to admit that I actually started out this scrapbooking journey with some stamps. I went to a stamping party and immediately was hooked.

However, there was a BIG lull for me when I didn't want to use stamps at all. I was just quite content scrapbooking with all the new goodies & toys out there in the scrapbooking industry that my stamps began to collect dust.

But over the years I've acquired a love for them again.
Since designing for Imaginisce I've found that I've used them even more on my layouts (not just cards .... which is where I usually think to use my stamps).

Here are a few examples of how I've used stamps.
This one I stamped the image with Versamark.
Supplies used: Bazzill cardstock, Imaginise (Scooter's Vacation: paper, flowers, stickers, stamps), transparency, EK Success corner rounded punch, Versamark

For this layout I stamped the little robot image with black ink and then colored it in with Tombow markers.
Supplies used: Imaginisce (Live Loud: papers, stamps, stickers, chipboard), Tombow markers, EK Success corner rounded punch

On this card I used the word stamp with Versamark on the background card and then stamped and colored the main image in like I did for the layout above.

Supplies used: Prism cardstock, Imaginisce (Live Loud: papers, stickers, stamps), EK Success corner rounded punch, Versamark, Tombow markers

I used a flower stamp for this layout on some patterned paper and then just colored in the center of the stamped flower image.

Supplies used: Core'dinations cardstock (Black Magic), Imaginisce (To Love & Cherish: papers, flowers, stamps, i-top brads), American Crafts Thickers

And lastly, on this layout I used a tree stamp on patterned paper and then cut out all the trees and adhered them along the bottom section of my layout. Some trees I adhered with pop dots ... others just flat.
Supplies used: Core'dinations cardstock, Imaginisce (Apple Cider: papers, chipboard, rub-ons, stamps, i-rock tool and crystals), VersaColor ink (in brown)

Thanks for looking & I hope that you're inspired a little to play with your stamp collection today!

Friday, October 8, 2010

Altered Tray by Karen

I love starting the fall season with Thanksgiving.  It is a great way to appreciate the new season and to recognize all that we have to be thankful for.
Here is an autumn tray, each space has its own little mini theme.


supplies : 7 gypsies, elles studio, best creation, jenni bowlin


Wishing eveyone a warm Thanksgiving.


tfl

Giving Thanks - by Cari Locken

I just love this time of year. I love the coolness in the air, the changing color of the leaves, hunting for the perfect pumpkin and making yummy comfy foods!

I also enjoy this time of year because we set aside a day to be thankful. (not that we should just do that one day of the year, don't get me wrong) but it is nice to have a day where we can actually sit down together and actually take the time to say what we are thankful for. I'm hoping to do just that this year at our dinner table before we dig in to our delicious turkey dinner meal.

In keeping with this theme of Giving Thanks I'd like to share a few projects with you that I've made.
I just made this layout this past week using one of my all-time favorite collections by Imaginisce, called Apple Cider. I love it. So rich & warm.

Supplies used: Imaginisce (Apple Cider - papers, ribbon, chipboard), I-rock tool (by Imaginisce), Fiskars border punch (leaf design), owl (My Little Bit of Whimsy), Core'dinations Cardstock

This little mini album is accordian style. I taught it last year at a retreat. It's so cute & easy to make.


Supplies used: chipboard, Bazzill Basics kraft colored cardstock, Scenic Route patterned paper, chipboard (Riff Raff Designs), flowers (Prima), stamps (Making Memories and Melissa Frances)

Here's another mini album that I've made. This one housing pictures of people and things that I'm thankful for. I'll be teaching this class again up at The Ultimate Scrapbook Retreat at Loon Lake in a few weeks.

Supplies used: Paper Trunk (papers, letter stickers), ribbon (Offray), punches (EK Success), Fiskars border punches, Bind-it-all machine and o-wires, Making Memories stamps

Have a blessed Thanksgiving everyone!